Setup Guide
Everything you need, in the order you'll actually do it, from creating your account to seeing your first event.
How GeoPulse works
In the portal, mark a real place on a map and set a radius around it.
Your app fires a geofence.enter or geofence.exit event the moment a user crosses that circle.
Send the event to your own server with a Webhook, or show a banner, message or popup alert right in the app with a Campaign. Either one, or both.
This guide has two parts: set things up in the portal first (no coding), then wire up your app's code. Do them in order, since each part needs something from the one before it.
Key terms
Part 1: Portal setup
Create your account
Go to the sign-up page and click Continue with Google. Your Google account creates your GeoPulse account the first time, and the same button signs you in afterwards, so there is no password to choose or forget. No credit card, no approval step.
Set up your workspace
Right after signup you'll be asked for an organization name and a project name. Submitting that one form creates all three things you need to get going: the organization, the project, and a starter application called "Playground".
You can create more applications later (one per mobile app you ship) from Projects → your project → Applications.
Add a Location and a Geofence
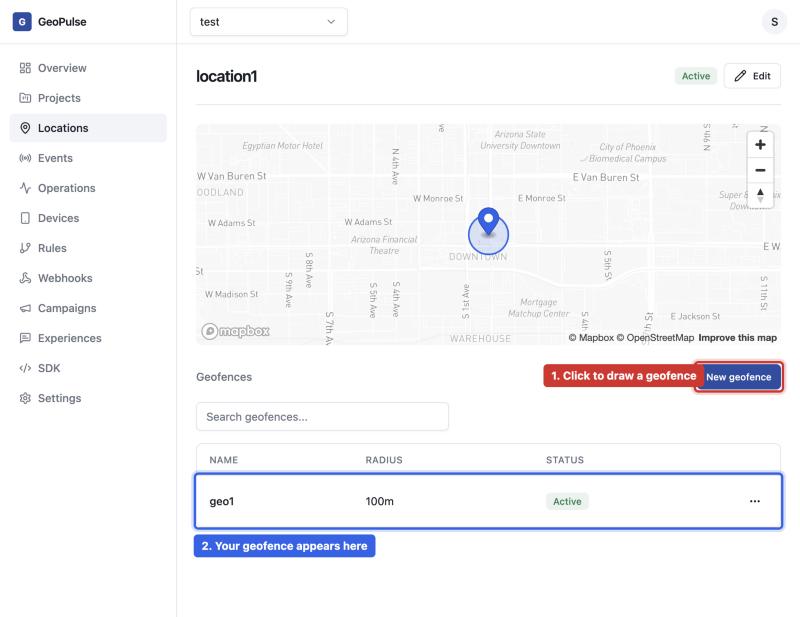
Open Locations → New location. Search for a place or click the map, give it a name, and save.
Open that location and click New geofence to draw a circle around it. This circle is exactly what the SDK checks against. A user's device entering or leaving it is what creates an event.
Get your SDK credentials
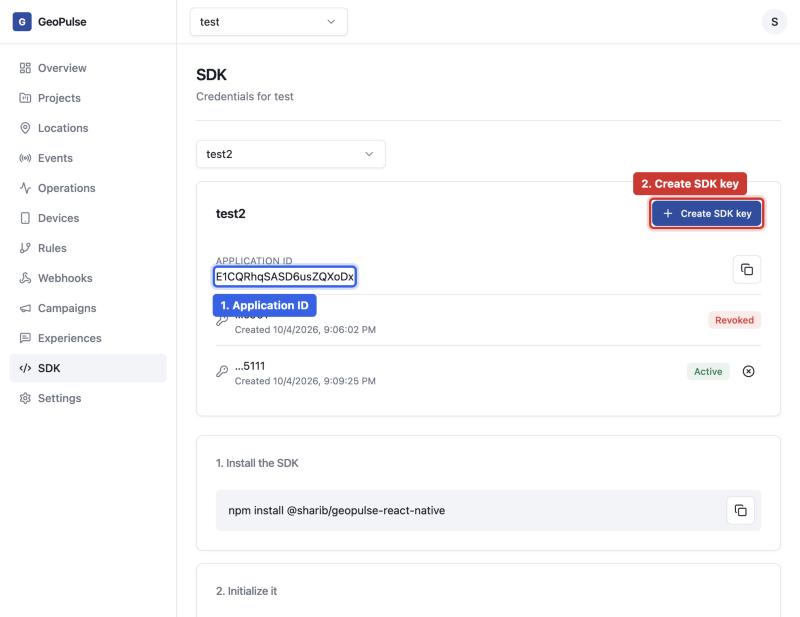
Open the SDK page and pick the application you want credentials for (use "Playground" to start). You need two values for your app's code:
- Application ID: always visible, just copy it.
- SDK key: click Create SDK key. It's shown once, so copy it immediately and save it somewhere safe. If you lose it, create a new one and revoke the old one.
Got your Application ID and SDK key? Now switch to your app's code.
Part 2: Add the SDKPart 2: Add the SDK to your app
Install the package
In your React Native / Expo app (React Native 0.73 or newer):
npm install @damn-coding/geopulse-react-nativeThat is the only install command. The SDK brings the packages it needs (expo-location, @react-native-async-storage/async-storage and @react-native-community/netinfo) with it. Two cases need one extra step:
- If
npx expo-doctorsays one of those packages is not the version your Expo SDK expects, runnpx expo install --fix. - In a bare React Native app without Expo, run
npx install-expo-modulesfirst, because location comes fromexpo-location. If a native module is reported as missing, add it yourself withnpx expo install <package>.
Allow location access
The SDK only ever asks for foreground location, never background. Add a usage description to app.json:
{
  "expo": {
    "ios": {
      "infoPlist": {
        "NSLocationWhenInUseUsageDescription": "Used to detect nearby places."
      }
    },
    "android": {
      "permissions": [
        "ACCESS_COARSE_LOCATION",
        "ACCESS_FINE_LOCATION"
      ]
    },
    "plugins": [
      [
        "expo-location",
        { "locationWhenInUsePermission": "Used to detect nearby places." }
      ]
    ]
  }
}Initialize the SDK
Use the Application ID and SDK key from Part 1, step 4:
import { GeoPulse } from "@damn-coding/geopulse-react-native";

await GeoPulse.initialize({
  apiKey: "<YOUR_SDK_KEY>",
  applicationId: "<YOUR_APPLICATION_ID>",
});Start it and listen for events
await GeoPulse.start(); // asks for location permission, starts watching

GeoPulse.on("geofence.enter", (event) => {
  console.log("entered", event.geofenceId);
});
GeoPulse.on("geofence.exit", (event) => {
  console.log("exited", event.geofenceId);
});Test it without leaving your desk
In development builds, the SDK runs on a built-in location simulator by default, so no real movement needed:
GeoPulse.simulator.setLocation({ latitude: 33.4484, longitude: -112.074 });Set it to coordinates inside the geofence you made in Part 1 and you should see geofence.enter fire right away.
Part 3: See it working, and go further
Watch the event arrive
Open Events in the portal. It updates live, and the enter/exit event you just triggered should show up within a few seconds.
Check your device registered
Open Devices. The first successful initialize() call registers the device automatically, and you'll see its platform and SDK version listed.
Optional: show something inside the app
Build an Experience (an alert, banner, card, or message; only the alert is a popup), then create a Campaign that triggers it on enter or exit for a geofence (or all of them). In your app, listen for it:
GeoPulse.on("experience.received", (payload) => {
  showBanner(payload.experience);
});Keep an eye on things
Operations shows whether anything failed recently and lists the latest failed and rejected events with the reason. It's the page to check if something seems off.
Portal pages: what each one is for
Every page in the portal, what it's for, and its link. Links to portal pages ask you to log in first if you aren't already. Pages with {id} in the URL are opened by clicking an item in the list above them.
- Sign upClick Continue with Google. Your Google account creates your GeoPulse account the first time, so there is no password to set./signup
- Log inClick Continue with Google to sign in. It is the same button as sign-up: new accounts are created on first use./login
- OnboardingShown once after sign-up: name your organization and first project. Creates both, plus a starter application called “Playground”./onboarding
Overview
/dashboardThe home page after you sign in: a snapshot of your workspace.
- See how many projects, applications, locations and events you have.
- See a summary of the project currently selected in the top bar.
Setup Guide
/docsThis page. Public, so you can share the link with anyone, no login needed.
- Follow the setup steps in order.
- Look up what any portal page is for.
Projects
/projectsA project groups applications, locations, events and everything else. Most pages show data for the project selected in the top bar.
- Create a project.
- Open a project to manage its applications and settings.
/projects/{projectId}Applications tab: create an application per mobile app you ship, and enable or disable it (a disabled application's SDK keys stop working). Settings tab: name, description and status.
Locations
/locationsNamed real-world places. A location on its own does nothing. The geofences inside it are what the SDK checks.
- Click New location, search for a place or click the map, then save.
/locations/{locationId}The location's map and its geofences. Click New geofence to draw a circle (name + radius). Edit or delete the location and its geofences here.
Events
/eventsEvery geofence.enter and geofence.exit event the SDK has reported, updating live.
- Filter events, or search for one by its event ID.
- Click an event to see its details: device, geofence, coordinates, and whether rules and campaigns processed it successfully.
Operations
/operationsWhat went wrong recently. This is the page to check when something seems off.
- Is anything wrong: a quick check of whether any events recently failed processing or were rejected before being stored.
- What failed recently: a table of the latest failed and rejected events, each one clickable for the reason and details.
- Totals, timings and webhook or campaign activity are not shown here. Use Events to browse everything that was reported.
Devices
/devicesEvery device that has run the SDK for this project. Devices register themselves on the first successful initialize(), so there's nothing to add by hand.
- See each device's platform, SDK version and when it was last seen.
- Search for a device by its ID (GeoPulse.getDeviceId() in your app).
Rules
/rulesWHEN an event matches, THEN deliver it to a webhook.
- Create a rule: a name, a trigger (enter or exit), an optional geofence (leave empty for all geofences), and the webhook to send to.
Webhooks
/webhooksYour own server endpoints that receive events. Every delivery is signed so your server can verify it came from GeoPulse, and failed deliveries are retried automatically.
- Create a webhook with a name and URL. Its signing secret is shown once, so copy it then.
/webhooks/{webhookId}Send test to check your endpoint, Regenerate secret if it leaked, and the full delivery history, where you can replay any delivery from there.
Campaigns
/campaignsWHEN a geofence event matches, THEN show the user an experience inside your app.
- Create a campaign: name, trigger (enter or exit), optional geofence, the experience to show, and an optional start/end date.
- Set the frequency so a user isn't shown the same thing too often (e.g. hours between deliveries).
Experiences
/experiencesThe content a campaign shows: an alert (popup), banner, card or message. Content only; your app decides where to draw it. Colors can be typed as a hex code or picked from the color chart.
- Create an experience: type, title, body, and optional image and call-to-action button (label + URL).
/experiences/{experienceId}/editEditor with Data and Style tabs and a live preview.
SDK
/sdkWhere you get the two values your app's code needs.
- Pick an application and copy its Application ID.
- Create an SDK key (shown once, so copy it immediately) or revoke an old one.
- Copy the install and initialize code, pre-filled with your values.
Settings
/settingsAccount and workspace settings.
- Profile: your display name.
- Organization: the organization's name (owner only).
- Project: the selected project's details.
- Data & export: download events and delivery history as CSV or JSON before the monthly cleanup deletes them.
SDK and backend basics
Short answers to the things people most often wonder about how the SDK, your app and the GeoPulse backend fit together.
Why changes take a moment
Nothing here is broken when a change is not instant. GeoPulse keeps recent answers in memory for a short time so a busy project does not hit the database on every request, which keeps it fast and keeps your bill small. Waiting is all you need to do, and none of this is a security gap: every request is still checked against your SDK key.
Good to know
- A phone sends at most one event per geofence every 2 minutes, and at most 3 events a minute overall. Walking in and out repeatedly, or standing on the edge where GPS wobbles, does not flood your project. Leaving only counts once the person is clearly outside (about 20 metres past the edge).
- A campaign you schedule for a later start is not given to people already inside; it applies to anyone who enters once it is active.
- An experience that has been waiting for a phone for more than a day is dropped, so nobody sees a stale welcome after being offline.
- Updates to people already inside need their app open (location is foreground-only). If their connection drops, the app catches up on its next check.
Your data: monthly cleanup and export
Events and delivery history are temporary. At the start of every month (00:00 UTC) GeoPulse deletes everything created before that moment, so each month starts fresh and the database stays small. It happens automatically: the cleanup runs the first time the backend is awake after the 1st, which is normally within the hour. For the last 7 days of the month a banner at the top of the portal reminds you, and it turns red in the final 24 hours.
Download what you need before the 1st: once the cleanup has run, deleted data cannot be recovered. Open Settings and choose the Data & export tab.
Troubleshooting
Still stuck? Reach out to the GeoPulse team.